Hey folks, hope you are doing good! It has been a while since I wrote a post here. So today let us discuss how to integrate Jenkins and Gitlab.
As you may know, Jenkins is a widely used Continuous Integration (CI) tool now-a-days and Gitlab is the leading integrated product for the entire software development lifecycle. Even though we have CI feature within the Gitlab, many prefer to use Jenkins along with Gitlab since it's more extendable with a lot more features and simple user interface.
Requirements for Gitlab – Jenkins Integration
- Jenkins GitLab Plugin
Build trigger that allows GitLab to trigger Jenkins builds when code is pushed or a merge request is created.
- Jenkins Git Plugin
This plugin allows use of Git as a build SCM, including repository browsers for several providers.
- Jenkins GitLab Hook plugin
Enables Gitlab web hooks to be used to trigger SMC polling on Gitlab projects
First open GitLab and go to Profile Settings
Then, click “Access Token” and create a Jenkins API Token.
Configure the Jenkins Server
Go to Jenkins and install Jenkins GitLab Plugin and Jenkins Git Plugin.Go to Manage Jenkins -> Configure System and scroll down to the ‘GitLab‘ section.
Write a custom connection name, enter the GitLab server URL in the ‘GitLab host URL‘ field and click Add -> Jenkins button.
Then, fill required fields as shown below with the Jenkins Access API Token which we created in GitLab before.
Then, select this API Token credential and finally click “Test” and see the “Success” message.
Create and Configure a Jenkins Job
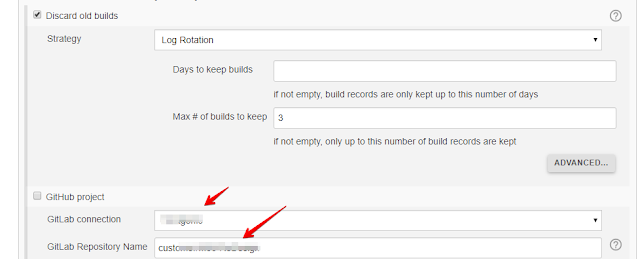
Create a new job on Jenkins and then click “Configure”.Give a project name, Click “Discard old builds” checkbox and write “3” for “Max # of builds to keep“. It only keeps last 3 builds and saves disk space.
For “GitLab connection” field, select predefined connection which is done with GitLab plugin above.
For “Gitlab Repository Name” write “<group name>/<repository name>“. You can see this on GitLab projects page.
Then go to Credentials –> System –> “Add domain” and click “Add credentials” as shown below,
Then, add your GitLab username and password as shown below and click OK.
After that, select “Git” as Source Code Management system. Fill “Repository URL“, Select Credentials which is added above, set branch, select repository browser as gitlab, and write your project URL and GitLab version as shown below.
Build Triggers
For build trigger section you can do below settings for changes going in to GitLab.And at last, we should add “Publish build status to GitLab commit” in the post build step to enable the feedback. It provides us notifications in GitLab.
For WebHooks go to your Project in GitLab and click settings icon and click “WebHooks”
Then add a WebHook. In the webhook you need to enter the build url and you may also need to generate a key in jenkins and paste it in the webhook. Finally if you click the 'Test' button, you should see “HTTP 200” response if it's working.
We have done the all settings! If you push a commit to the GitLab repository, you will see the Jenkins job start running and when the job finishes, you will see the status next to the commit in GitLab.
Notes
- You can also try using SSH Key Pairs. For that please check instructions here and you may also check this awesome article.


